November 10, 2012

How to Create a Minnie Mouse Bow Holder


I thought this would be the perfect present for my daughter's Minnie Mouse Birthday Party.  Not only are her bows all over her room, but they somehow end up all over the entire house.  I was in desperate need of a cute and creative way to keep track of all her bows!  This is what I made.  I have looked at many bow holders on the internet and decided to make my own.  

Step 1: Trace the outline of a ballet leotard onto a paper.  Cut it out and trace it onto a piece of foam board.  Next use an Exacto knife to cut it out.


Step 2: Cut out a piece of batting the same size of the foam cut out.  

Step 3:  Cut out a piece of material about an inch wider than the entire paper leotard.  Next you will need to cut slits into all of the curves of the fabric.  This will help you be able to pull the fabric tight over the foam board.

Step 4: Place your fabric face down, then the batting, and then your foam board.  Now, start to glue the fabric to the foam board, by tightly pulling the fabric over the foam board.

Step 5:  Cut 18-24" pieces of tulle for the skirt.  The amount of tulle needed depends on how full you want the skirt to be.  Tie 6-8 strips of tulle together using tulle.  Glue these down on the fabric a little lower than the waistline.  

Step 6: Cut and glue 3-5 strips of ribbon on top of the tulle.  Then glue a 3-4 inch ribbon to on top of the tulle and ribbon.  Pull the ribbon tightly to the back and hot glue. Finish by adding a ribbon to the top straps of the leotard to hang the bow holder.

And that's it!  You can add jewels, flowers, sequins or anything else.  The idea is to take the basic design and then spice it up and make it your own.  As always be creative!  

November 09, 2012

How to Create Minnie Mouse Ears


I was looking to buy Minnie Mouse Ears for my daughter's Minnie Mouse Birthday Party.  The cheapest I found was $7 before shipping.  I needed quite a few so I decided to try and make my own to save some money.  All you need is a headband, black felt, foam, ribbon, and hot glue.  I found simple instructions at this website.  My daughter loves wearing her ears and she won't take them off!


September 18, 2012

How to Create Dr. Suess Hats


For letter "D" in preschool this week, we talked about Dr. Seuss.  After reading Dr. Seuss books we had are snack.  I made my girls Dr. Seuss hats out of strawberries, bananas, and green apples.  This was super simple and my girls loved it!

Step 1: Cut up your fruit into thin slices.
Step 2: Stack your fruits.  Start with a slice of green apple as the base.  Then alternate strawberry and banana slices.  Top with the base of a strawberry.

That's it! Now you have made a fun, healthy snack, that your kids are going to love!

August 22, 2012

How to Clean and Charge your Car Battery

Car Battery Tune Up

After getting both my kids buckled in the car, I went to start my car and to my disappointment it wouldn't start.  My battery was dead.  With my husband always gone at medical school, I called my dad to figure out what I should do.  My dad walked me through, step by step, on how to freshen up my battery and recharge it so my car will work again.  It was not difficult and every girl out there should know the basics of a car battery tune up.

First of all it is important to invest in some sort of tool set.  When I first moved out to the country I realized I needed two things to survive: a gun and some tools.  The gun is for protection and the tools have saved me so much time and money!


When I first popped my hood and found my battery, it was not looking too good.  The first thing you should do is clean it off.  I always take a cup of water and add baking soda to it and stir up.  Then slowly dump the mixture all over your battery.  There should be foam where ever the baking soda hits the dried battery acid. You may need to repeat this several times.  Once the foaming stops, pour one more glass of water to clean everything off. 

 
Once the you have cleaned the battery, it is important to clean off the terminals.  Loosen and remove the bracket around the terminals.  Take sand paper and rub all around both terminals.  After this, hook up and tighten the terminals.

The last thing you need to check is the battery acid level.  Take an old rag and a flat head screw driver and slowly pop open the battery lid.  Be careful because anything you get battery acid on will be destroyed.  The acid level should be about 1/2 inch from the top.  If the fluid level is low, add some distilled water and put the lid back on. 

Once the battery has been cleaned, hook up a battery charger.  Depending on your charger, it could take several hours or over night to charge your battery.  Once your battery is charged you should be ready to go and you can pat yourself on the back because you just took tuned up your battery without the help of your husband...heck yeah!

August 19, 2012

How to Create Freezer Meals

Crock Pot Mania
I have been struggling with deciding what to cook and being motivated to cook each night.  Some days I am just simply too tired and I just want to eat with out putting in the effort to cook!  I decided to make some freezer meals that just need to be thrown in the crock pot at noon and voila dinner is served that night.  It took me two days, but in the end I had 18 dinners in the freezer!  Here is how I pulled it off:

Day 1
Organize your shopping list to make getting groceries simple and quick.  I always organize my food list in order of the store I shop at.  List all the categories:
Produce
Dry
Meat
Dairy
Frozen
Other
List all the items needed under each section.  Print it out and you are ready to go. 

Buying the groceries can seem like a daunting process, but if you follow your list you can hit each section in the grocery store, get what you need, and get out before hours go by.  I am all about efficiency!  Then come home, unload everything and relax!  If you feel up to it start cooking, but if you are like me, going food shopping with two kids under the age of 4 is draining and I need to be fresh if I am going to attempt to make 18 meals!


Day 2
Prepare and assemble.  Label each ziploc bag with name of dinner and directions on how to cook it.
Begin cutting up all vegetable that go into the dinners.  I had to take a break cutting the onions, but other than that cut everything up and place in bowls.  This makes assembling easier. 
After about 4 hours of cooking and assembling this is what I had to show:
Potato Soup
Chicken Dumplings
Bow Tie Casserole
Tin Foil Dinner - Chicken style
Tin Foil Dinner - Hamburger style
Teriyaki Chicken
BBQ Chicken
Spaghetti and Meat sauce
Lasagna
(2 Dinners for each)

Some of the dinners

Not a crock pot meal, but a must have for freezer meals!


I opened up a dance studio to help support our family while my husband attends medical school.  I will use 3 meals each week (the nights that I teach) and I will have meals for 6 weeks!  At least my husband can't complain about me not cooking for a little while :)

August 08, 2012

How to Create Fresh Peach Cobbler


I just got back from the farm, and my father-in-law sent us home with a basket of fresh South Carolina peaches.  These are freestone Elberta peaches, and they are amazing!  Here is my new favorite Peach Cobbler recipe.

Fresh Peach Cobbler

Ingredients:
- 6-8 fresh peaches, pitted and sliced
- 1 cup water
- 1 yellow cake mix
- 8 oz of cream cheese (softened)
- 1/2 cup of butter (melted)

Directions:
1. Preheat oven to 350° F
2. Spread peach slices evenly into a 9x13 inch baking dish.  Pour 1 cup of water over the peach slices. 

3.  Combine cream cheese and yellow cake mix.  Mix until crumbly.  Spread mixture over peaches.  Pour melted butter over everything.

4.  Bake for 45 minutes, until golden.

Enjoy!

August 01, 2012

How to Create a Wall Display of Pictures


Supplies you will need:
-  Chain
- Paper Clips
- Pictures
- 4 Nails 
- Hammer

I bought about 4 yards of black chain to match the black furniture in my daughter's room.  I cut my chain into 2 equal pieces.  Measure and mark where your nail holes need to go on the wall.  Then nail the ends of each chain into the wall.  Do one chain at a time so you can decide how much you want your chain to sag and then match the second one.  Once the chains are hung, start hanging your pictures with paper clips.  That's it your done!  This is super easy and a great way to display a lot of pictures without having to pay for expensive frames.  


You can also use ribbon, rope, or whatever you want.  Be creative!

February 26, 2012

How to Create a Fabric Birthday Crown


 Materials:
- 2 different types of material (I had 1/3 of a yard cut, but I am making more than one)
-  8.5" x 11" Felt (x2)
- Thread 
- Any other matching accessories (ribbon, feathers, flowers etc.)


Step 1
Make a crown template by taping two pieces of computer paper together and cut your crown out.  My crown measured 18" across with tallest point measuring 6.5" and the smaller points measuring 4".


Step 2
Sew two pieces of felt together on one end. Then pin the crown template to the felt and cut out.  Next pin the crown template to the fabric and cut out.


Step 3
Pin the fabric (right side showing) to the felt.  Sew along the outer edge of the entire crown


Step 4
Complete the crown with elastic sewn onto the back of each end of material.  The length will depend on the size of head wearing the crown.

Accents:
I cut a long thin piece of the pink material and gathered it and sewed it on the bottom of the crown.  I then hot glued some silver ribbon on top of the pink.  I also cut a 7 out of felt and sewed it on the middle of the crown.  I added rhinestones with hot glue.  I also added a felt flower and a white feather for a little extra flare :)


Finished Birthday Crown
This finished crown was for one of my dance students that was having a dance birthday party here at my studio. This will complete her ballerina princess outfit for a day full of dancing with her friends!


February 17, 2012

How to Create a Busy Bag: Stop Light Commands

Preschool Crafts
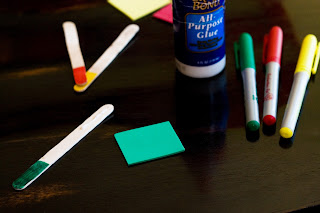
After making the Stoplight bean bags, I decided to have a school lesson for my daughter focused on the colors of the stoplight.  During the lesson we played the with the stoplight.  She has learned the three colors in Spanish and can now say the color and tell me what each color means.  For our craft today, we color coded popsicle sticks to mimic what she has learned with the stoplight. 

Supplies:
 - 3 popsicle sticks
 - green, yellow, and red foam
 - green, yellow, and red markers
 - glue
 - scissors


My daughter is almost 3 and this is a great project that she can do all on her own while I make a set for my other daughter who is 15 months.  My little girl cut out squares and glued them onto the popsicle sticks.  I colored the bottom of each stick to match the foam color.  I then wrote "Go", "Slow", and "Stop".  This a super easy craft!  


Game
Have all your students start at one end of the room or hallway.  Alternate showing each popsicle stick.  Have your students say the color and what each color means.  Then have them follow the command according to the color.  You can let your students take turns holding up the colors.  You can also teach the commands in Spanish.

January 30, 2012

How to Create a Busy Bag: Stop Light Bean Bag Toss

Stop Light Bean Bag Toss
I just went to a Busy Bag swap party. I had never been to one and let me tell you it was awesome!!
I came home with 13 different activities for my little girls to play with and they were very excited. For the party I made a stop light and red, yellow, and green bean bags to match the lights. The idea is to throw the bean bag onto the stop light and have the colors match. This game helps with eye and hand coordination, colors and shapes. My almost 3 year old loves it!


How to Make Bean Bags:
Materials:
- Red, green, and yellow material and thread (I used 1 yard of each, but I made 42 bean bags)
- Beans to fill bean bags (I used lentils because I prefer a smaller bean inside the bag)
- Rotary Cutter and mat
- Funnel

1. Cut 6 in. x 6 in. squares out of all the material (If you are just making one bean bag of each color then you need two squares cut out of each color)
2. Sew a continuous stitch around each square, leaving a 1-2 in. gap
3. Turn square inside out 
4. Fill each bag with bean using a funnel
5. Sew up the hole

How to Make a Stop Light
- Black Poster Board
- Red, green, and yellow foam squares
- Glue
- Scissors
- Bowl

1. Trace and cut a circle out of each foam square. (I used the bottom of a cereal bowl for my circle)
2. Cut a rectangle out of the black poster board. (I used 6 in. x 15 in. and folded in thirds in order to fit inside a gallon size bag)
3. Glue circles to poster board